FIXED! – Very slow Steam loading times on startup.
After months of putting up with slow Steam loading in like 2 minutes or so on Windows startup, finally I decided to do some research for a fix!
This was also prompted by purchase of a rocket powered new SSD drive.
As usual, quick Google search leads to a number of peoples suggested fixes, none of them working for me!
However, although no instructions, I did come across someones passing comment “Task Scheduler”.
AHH YES! I think to myself. 5 minutes later and a quick reboot, “der der” IT WORKS!!!
To all other people reading this, I hope it works great for you also…
To fix slow Steam loading times on your PC.
 Our first task is to remove the “automatic load on startup” within the Steam Client.
- In the Windows system tray, ‘Right Click’ the Steam icon, and choose Settings from the menu.
 Within the settings window now showing, navigate your way to the Interface menu option. Follow this by ‘unticking’ the Run Steam When My Computer Starts box.
(This now removes any auto start function from the Steam Client itself!)

 Now we assign Windows instead to deal with the “automatic load on startup”.
- Click on the Windows Start Menu, then navigate to Accessories >> System Tools >> Task Scheduler
- Now ‘Right Click’ Task Scheduler Library and choose the Create Basic Task option from the menu.
 Now we fill in the boxes with the following. For ‘Name’ use Steam Client Start, and for ‘Description’ use Start Steam at Windows startup. Click ‘NEXT!’

- For the next section “Task Trigger”, use the option When I Log On. Click ‘NEXT!’
- For the next section “Action”, use the option Start A Program. Click ‘NEXT!’
 Following this, you will be prompted to ‘browse for a program’. Click the ‘Browse’ button and simply navigate to your “Steam Client” directory and choose the Steam.exe file. (Typically found in “C:\Program Files (x86)\Steam\Steam.exe”). Click ‘NEXT!’

 On this last current step, before you click the finish button, please make sure you ‘check’ the Open the Properties Dialog… box. Click ‘FINISH!’
- The ‘Properties’ window should now be showing.
- Choose the Triggers tab from along the top. Click the ‘EDIT’ button.

 Now, here is where we set the delay for when Windows is starting.
- Click the Delay Task For box, and manually input into the corresponding dropdown box 15 seconds (This is manually inputted, as the preset minimum time is 30 seconds).
- Click ‘OK’. Followed by ‘OK’ again.
 FINISHED!

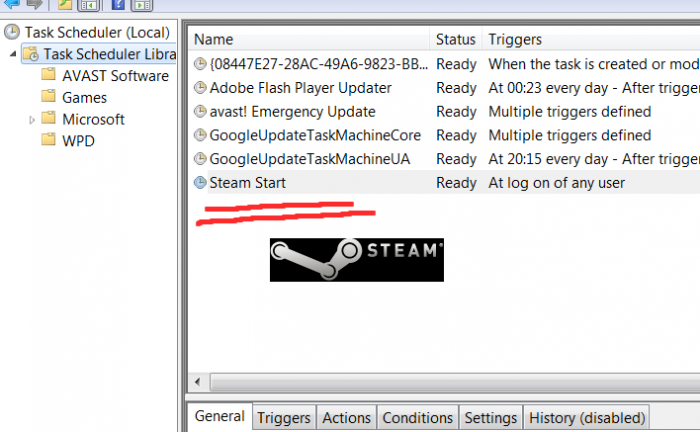
That’s it, you should now see your newly created task on the main task scheduler list. All that’s left, simply close the Task Scheduler program.
If you have found this article useful, and would like to donate towards keeping my site up and running,
Please Click The Button Below.
We hope this proves useful to you.
Please share this BitsaThis, BitsThat article with all your friends & collegues.
Have a nice day!
 Email This Post
Related posts


Comments RSS Feed